DOM Introduction
From HTML to the DOM
Web pages rely on HTML for their initial structure and content. We write web pages using HTML, and then use web browsers to parse and render that HTML into a living (i.e., modifiable at runtime) tree structure. Consider the following HTML web page:
The DOM Tree is a living version of our HTML.
<!DOCTYPE html>
<html>
  <head>
    <title>This is a Document!</title>
    <meta charset="utf-8" />
  </head>
  <body>
    <h1>Welcome!</h1>
    <p>This is a paragraph with a <a href="index.html">link</a> in it.</p>
    <ul>
      <li>first item</li>
      <li>second item</li>
      <li>third item</li>
    </ul>
  </body>
</html>
The browser will parse and render this into a tree of nodes, the DOM Tree:
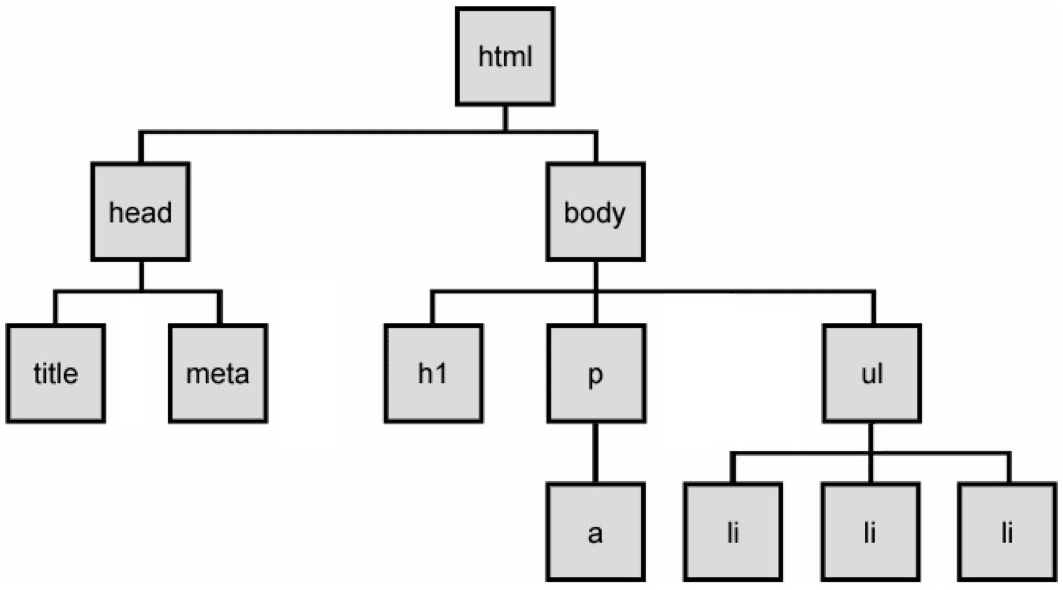
The DOM Tree is made up of DOM Nodes, which represent all aspects of our document,
from elements to attributes and comments. We'll refer to nodes and elements interchangeably,
because all elements are nodes in the tree. However, there are also other types of nodes,
for example: text nodes (the text in a block element) and attribute nodes (key/value pairs).
We don't always show every node in our diagrams. Consider the <p> element from the example
above:
<p>This is a paragraph with a <a href="index.html">link</a> in it.</p>
Here are the nodes that would be created:
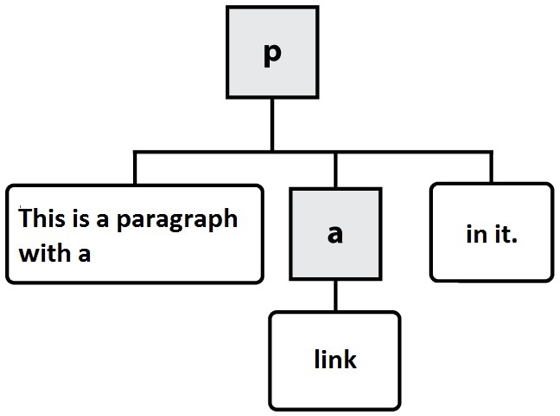
In this diagram, the gray, square boxes represent element nodes, while the white, rounded boxes are text nodes.
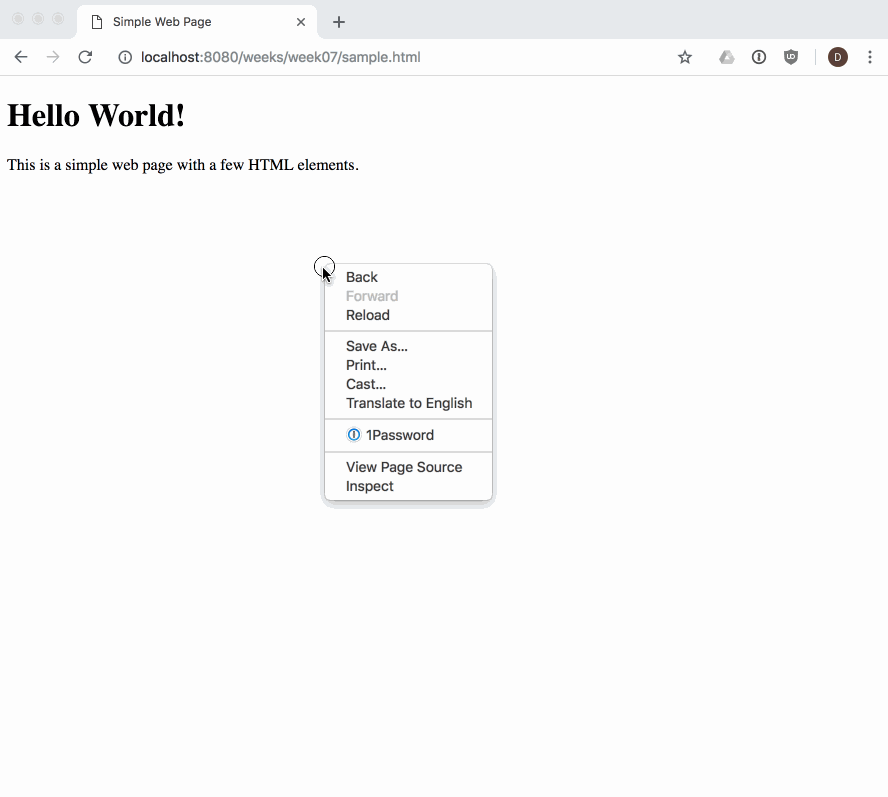
When we load a web page in a web browser, we see its fully parsed and rendered form. The web browser begins with the initial content we provide in our HTML. We can see the initial source HTML for any page we visit, whether we authored it or not:
Our DOM Tree gets its name because of its shape: a root element connected to child nodes that extend like the branches of a tree. This tree structure is how the browser views our web page, and is why it is so important for us to open and close our HTML tags in order (i.e., our tags define the structure of the tree that the browser will create at runtime).
As web developers we can see and interact with the DOM tree for a page using the browser's built-in developer tools:
The dev tools allow us to view and work with the parsed DOM elements in a page. We can also use the dev tools to visually select an element in the page, and find its associated DOM element:

NOTE: it's a good idea to get experience using, and learn about your browser's dev tools so that you can debug and understand when things go wrong while you are doing web development. There are a number of guides to help you learn, like this one from Google.
Programming the DOM
Web pages are dynamic: they can change in response to user actions, different data, JavaScript code, etc. Where HTML defines the initial structure and content of a page, the DOM is the current or actual content of the page as it exists right now in your browser. And this can mean something quite different from the initial HTML used to load the page.
Consider a web page like GMail (or another email web client). When you visit your Inbox, the messages you see are not the same as when your friend visits hers. The HTML for GMail is the same no matter who loads the page. But it quickly changes in response to the needs of the current user.
So how does one modify a web page after it's been rendered in the browser? The answer is DOM programming. We've been using this "DOM" acronym without defining it, and its high time we did.
The Document Object Model (DOM) is a programming interface (i.e., set of Objects, functions, properties) allowing scripts to interact with, and modify documents (HTML, XML). The DOM is an object-oriented representation of a web page. Client-side web programming is essentially using the DOM via JavaScript to make web pages do things or respond to actions (e.g., user actions).
You may have noticed in our work with JavaScript that there was nothing particularly "webby" about it as a language: we wrote functions, worked with arrays, created objects. Lots of programming languages let you do this. JavaScript can't do anything with the web on its own. Instead, we need to access and use the Objects, functions, and properties made available to us by the DOM using JavaScript.
As web programmers we use the DOM via JavaScript to accomplish a number of important tasks:
- Finding and getting references to elements in the page
- Creating, adding, and removing elements from the DOM tree
- Inspecting and modifying elements and their content
- Run code in response to events triggered by the user, browser, or other parts of our code
Let's look at each one in turn.
Finding elements in the DOM with JavaScript
Our entry point to the DOM from JavaScript is via the global variable window.
Every web page runs in an environment created by the browser, and that environment includes
a global variable named window,
which is provided by the browser (i.e., we don't create it).
There are hundreds of Objects, methods, and properties available to our JavaScript code
via window. One example is window.document,
which is how we access the DOM in our code:
// Access the document object for our web page, which is in the current window
let document = window.document;
NOTE: since properties like
documentare available on the globalwindowobject, it is common to simply writedocumentinstead ofwindow.document, since the global object is implied if no other scope is given.
Our document's tree of elements are now accessible to us, and we can access a number of well-known elements by name, for example:
// Get the value of the document's <title>
let title = document.title;

// Return a reference to the document's <body> element
let body = document.body;

// Return a list of all <a> elements in the document
let hyperlinks = document.links;

// Return a list of all the <img> elements in the document
let images = document.images;
There are lots more. We can easily experiment with these in the dev tools web console,
where we can access our window object. For example, here is the web page
https://unsplash.com/search/photos/toronto with the
web console open, and the result of window.document.images is shown, 41 <img> elements
are returned in a collection:

We can also use a number of methods to search for and get a reference to one or more elements in our document:
document.getElementById(id)- returns an element whoseidattribute/property has the givenidString<div id="menu">...</div>
<script>
let menuDiv = document.getElementById('menu');
</script>document.querySelector(selectors)- similar todocument.getElementById(id), but also allows querying the DOM using CSS selectors for an element that doesn't have a unique id:<div id="menu">
<p class="formatted">...</p>
</div>
<script>
// We can specify we want to query by ID using a leading #
let menuDiv = document.querySelector('#menu');
// We can specify we want to query by CLASS name using a leading .
let para = document.querySelector('.formatted');
</script>document.querySelectorAll(selectors)- similar todocument.querySelector(selector), but returns all elements that match the selectors as aNodeList:<div id="menu">
<p class="formatted">Paragraph 1...</p>
<p class="formatted">Paragraph 2...</p>
<p class="formatted">Paragraph 3...</p>
</div>
<script>
// Get all <p> elements in the document as a list
let pElements = document.querySelectorAll('p');
// Loop through all returned <p> elements in our list
pElements.forEach(function (p) {
// p is one of the returned <p> elements
});
</script>
These four methods will work in any situation where you need to get a reference to
something in document. In fact, you could rely solely on document.querySelector() and
document.querySelectorAll(), which cover the same functionality as a number of other
DOM methods:
// The following two lines of code do exactly the same thing.
// NOTE the use of # to indicate `demo` is an id in the second example.
let elem = document.getElementById('demo');
let elem = document.querySelector('#demo');
Creating elements and Modifying the DOM with JavaScript
In addition to searching through the DOM using JavaScript, we can also make changes to it. The DOM provides a number of methods that allow use to create new content:
document.createElement(name)- creates and returns a new element of the type specified byname.let paragraphElement = document.createElement('p');
let imageElement = document.createElement('img');document.createTextNode(text)- creates a text node (the text within an element vs. the element itself).let textNode = document.createTextNode('This is some text to show in an element');
These methods create the new nodes, but do not place them into the page. To do that, we first need to find the correct position within the existing DOM tree, and then add our new node. We have to be clear where we want the new element to get placed in the DOM.
For example, if we want to place a node at the end of the <body>, we could use .appendChild():
let paragraphElement = document.createElement('p');
document.body.appendChild(paragraphElement);
If we instead wanted to place it within an existing <div id="content">, we'd do this:
let paragraphElement = document.createElement('p');
let contentDiv = document.querySelector('#content');
contentDiv.appendChild(paragraphElement);
Both examples work the same way: given a parent node (document or <div id="content">), add
(append to the end of the list of children) our new element.
We can also use .insertBefore(new, old) to accomplish something similar: add our new node before
the old (existing) node in the DOM:
let paragraphElement = document.createElement('p');
let contentDiv = document.querySelector('#content');
let firstDivParagraph = contentDiv.querySelector('p');
contentDiv.insertBefore(paragraphElement, firstDivParagraph);
Removing a node is similar, and uses removeChild():
// Remove a loading spinner
let loadingSpinner = document.querySelector('#loading-spinner');
// Get a reference to the loading spinner's parent element
let parent = loadingSpinner.parentNode;
parent.removeChild(loadingSpinner);
Examples
-
Add a new heading to a document
// Create a new <h2> element
let newHeading = document.createElement('h2');

// Add some text to the <h2> element we just created.
// Similar to doing <h2>This is a heading</h2>.
let textNode = document.createTextNode('This is a heading');
// Add the textNode to the heading's child list
newHeading.appendChild(textNode);

// Insert our heading into the document, at the end of <body>
document.body.appendChild(newHeading); -
Create a new paragraph and insert into the document
<div id="demo"></div>
<script>
  // Create a <p> element
  let pElem = document.createElement('p');

  // Use .innerHTML to create text nodes inside our <p>...</p>
  pElem.innerHTML = 'This is a paragraph.';

  // Get a reference to our <div> with id = demo
  let demoDiv = document.querySelector('#demo');

  // Append our <p> element to the <div>
  demoDiv.appendChild(pElem);
</script>
Inspecting, Modifying a DOM element with JavaScript
Once we have a reference to an element in JavaScript, we use a number of properties and methods to work with it.
Element Properties
element.id- theidof the element. For example:<p id="intro"></p>has anidof"intro".element.innerHTML- gets or sets the markup contained within the element, which could be text, but could also include other HTML tags.element.parentNode- gets a reference to the parentnodeof this element in the DOM.element.nextSibling- gets a reference to the sibling element of this element, if any.element.className- gets or sets the value of theclassattribute for the element.
Element Methods
-
element.querySelector()- same asdocument.querySelector(), but begins searching fromelementvs.document -
element.querySelectorAll()- same asdocument.querySelectorAll(), but begins searching fromelementvs.document -
element.scrollIntoView()- scrolls the page until the element is in view. -
element.hasAttribute(name)- checks if the attributenameexists on thiselement -
element.getAttribute(name)- gets the value of the attributenameon thiselement -
element.setAttribute(name, value)- sets thevalueof the attributenameon thiselement -
element.removeAttribute(name)- removes the attributenamefrom thiselement
Examples
-
Reveal an error message in the page, by removing an element's
hiddenattribute<!-- The `hidden` attribute means this <div> won't be displayed until it's removed -->
<div id="error-message" hidden>
<p>There was an error saving the document. Please try again!</p>
</div>
<script>
// Try to save the file, and
let error = saveFile();
if (error) {
let elem = document.querySelector('#error-message');
elem.removeAttribute('hidden');
}
</script> -
Insert a user's profile picture into the page
// Insert the user's picture (e.g., in response to hovering over a username)
let profilePic = document.createElement('img');

// Set attributes via getters/setters on the element vs. attributes
profilePic.id = 'user-' + username;
profilePic.height = 50;
profilePic.src = './images/' + username + '-user-profile.jpg';

// Insert the profile pic <img> into the document
document.body.appendChild(profilePic);

// Make sure the new image is visible, or scroll until it is
profilePic.scrollIntoView(); -
Add new paragraph elements to a div
// Use .innerHTML as a getter and setter to update some text
let elem = document.querySelector('#text');

elem.innerHTML = '<p>This is a paragraph</p>';
elem.innerHTML = elem.innerHTML + '<p>This is another paragraph</p>';